How to Solve a Rubiks Cube 3x3 Easy
How to Solve a 3x3x3 Rubik's Cube Easily
I enjoy solving puzzles of all types, but the Rubik's Cube will always be my favorite.
Learn how to solve a 3x3x3 Rubik's Cube in seven easy steps.
Introduction to Solving the 3x3x3 Rubik's Cube
Have you ever wanted to solve a Rubik's Cube? Search no more! Read on for a simple, step-by-step guide to solving the classic, world-famous puzzle.
The Rubik's Cube is the most famous puzzle worldwide. It is both loved and hated for being so seemingly complex, and addictive, at the same time. It was invented in 1974, by the Hungarian inventor, architect and professor Ernő Rubik.
Many people have tried to solve the cube—but many have failed and given up in frustration. A few brave souls took on the challenge, and after years of countless attempts, someone found a solution. More and more people tried and succeded, but there was always the majority of people who just could not solve it. After twisting and turning the cube in vain, they found themselves removing and replacing stickers and/or cubies, in the attempt to restore the cube back to its colourful and perfectly original configuration.
Keep reading for an easy to follow, seven-step tutorial on how to solve the notorious 'puzzle cube'.
Getting Started
First, you will need a 3x3x3 cube. You could try to learn how to solve it without the cube, but it is a lot harder. If you do not have a 3x3x3 cube, any Rubik's Cube will suffice, as you could just focus on solving the corners, which is almost the same as solving a 3x3x3.
As an introduction, watch the video below for an in-depth guide on how to solve the cube. If you know the basics, i.e., how to solve one side, scroll down to the worded tutorial for a less detailed solution.
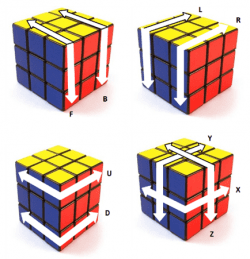
A picture showing each of the notations
Terminology
In the following video and tutorial, I will use certain cube notations to describe the moves that will be needed to be carried out, in order to solve the cube.
Notations
- R - Right
- L - Left
- U - Up
- D - Down
- F - Front
- B - Back
- X - Middle front (left-right)
- Y - Middle front (up-down)
- Z - Middle side (around cube)
When one of these letters are shown, you look at the appropriate side and turn that face clockwise.
Sometimes, one of the letters (shown above) is followed by another letter or number. These could change what each move does, and it could change the whole outcome of the cube. make sure you look out for the following:
Additional Notations
- An 'i' after a letter means 'inverted'. This means that when you look at the appropriate face, you turn the face anti-clockwise instead of clockwise.
- A '2' after a letter means you have to turn the appropriate face twice, instead of just once. Fortunately, it does not matter which way you turn the face, as long as you turn it twice, because it will have the same outcome, either way.
- A 'cubie' is one of the smaller cubes, that make up the whole Rubik's Cube
- If it says 'X', turn the corresponding cubies from left to right.
- If it says 'Y', turn the corresponding cubies from down to up.
- If it says 'Z', turn the corresponding cubies clockwise from your point of view.
A picture of the side notations that will be used has been included on the right of this text module. If you cannot see the picture clearly, zoom in on your browser (keyboard shortcut: ctrl + +).
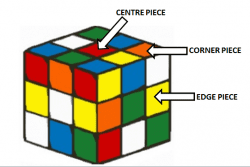
Learn this piece names.
Scroll to Continue
An Introduction to Solving the Cube
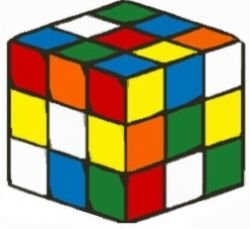
First of all, you must learn what colours are where, on a Rubik's Cube. On a standard cube, the opposite colours are: red and orange, blue and green, and white and yellow. Once you know this, you may start.
Before you begin, you must first prime the cube. To do so, pick a corner cubie and turn the cube so the selected piece is the upper-right-hand corner cubie, on the front of the cube. It can be any colour, but for this tutorial, I will use the blue-red-white corner, with the blue on top, the white at the front and the red on the right. Then, turn the sides attached to the selected cubie so the colour of the top of the corner matches the colour of the center piece, for example, in my description, is blue. You can move the Blue center around in any direction you want until it arrives at the correct top-center position as shown. By priming the cube in this way, you have already solved two of the top row cubies. We are now ready to solve the rest of the cube.
Tutorial: How to Solve a Rubik's Cube in 7 Steps
As of this point, you should have primed your cube. Now you can begin the solving stage.
Step 1: Solve the Top Row Corners
First, find a corner cubie with blue on it, and put it somewhere underneath where it needs to go. This could be in the correct place, just the wrong position, or in the corner piece directly below that. If not, turn the bottom face a few times, so the missing piece is below where you want it to go. Then, do the following algorithm: Ri, D, R, Di
You may have to repeat the algorithm up to six times. Do this for all corner pieces on the first side.
Make sure the colours of the face of each cube is the same as the colour of the centre piece of the face
Step 2: Place the Top Row Edges
- If the missing cubie is on the bottom face, with the colour of your first side facing down, turn the bottom face until it is directly underneath where it needs to go. Then, face the destination of that cubie, and do the following algorithm: Yi, D2, Y
- If the missing cubie is on the bottom face, with the colour of your first side facing towards you, turn the bottom face so it is directly below where it needs to go. Turn the whole cube so you are facing the cubie. Then, do the following algorithm: D, Yi, Di, Y
- If the missing cubie is in the second layer, turn the cube so the selected cubie is on the right, and do the following algorithm: Ri, Di, R, Di, F, D, Fi. Then, do the algorithm showed in number one or two (whichever one applies).
- If the missing cubie is in the correct place, but the wrong way round, face that piece and do the following algorithm: Yi, D2, Y, D, Yi, Di, Y
- If the missing cubie is in the top face, but in the wrong place, but the correct way round, face the piece and do the following algorithm: Yi, D, Y. Then, turn the whole cube so you are facing where the cubie needs to go, and turn the top face as many times as you need to so it is above where you need to go. Then do the following algorithm: D, Yi, Di, Y
- If the missing cubie is in the top face but the wrong place and the wrong way round, do face the piece and do the following algorithm: Yi, D2, Y. Then, turn the whole cube so you are facing where the cubie needs to go, and turn the top face as many times as you need to so it is above where the missing cubie is. Then do the following algorithm: D, Yi, Di, Y
Step 3: Complete the Second Layer
First of all, you have to make sure that the second layer centrepieces match up to the first layer, so you have a 'T' shape of each colour. Then, position the missing cubie underneath the centre piece of the colour, so you have three facelets of the same colour in a row, connecting the top and bottom sides. If that piece needs to go to the left of the centre piece, carry out this algorithm: Di, L, Di, Li, D, Fi, D, F. If that piece needs to go to the right of the centre piece, do this algorithm: D, Ri, D, R, Di, F, Di, Fi
Sometimes, after doing the algorithm, the piece goes in, but the wrong way around. If this is the case, do the algorithm once more, reposition the piece and re-do the algorithm.
Repeat this for all edge pieces on the second layer.
Step 4: Make the Last Layer Cross
Before you start this step, you must turn the whole cube upside down, so your starting side is at the bottom, which in my case is blue, so the opposite colour, green, is now at the top.
If no edge pieces have been rotated correctly on the top layer, carry out this algorithm: Y, U, Yi, U2, Y, U, Yi, U, Y, U, Yi, U2, Y, U, Yi
If there are two solved edge pieces on the face, making an 'L' shape with the centre piece, turn the top side until they are surrounding the top- front-right corner, (nearest to you, on the right) and do this algorithm: Y, U, Yi, U2, Y, U, Yi
If there are two solved edge pieces on the face, making an 'I' shape or a '-' shape with the centre piece, turn the top face so the solved green edges and the centre piece makes a horizontal line, and do the following algorithm: Li, Ui, L, U, F, U, Fi
If there are four solved edge pieces, the cross will already be solved, and you can just move on to the next step.
Step 5: Orient the Last Corners
If there is one solved corner, turn the cube so that cubie is in the bottom left corner of the upper face, and carry out the following algorithm. Doing this will preserve the solved edge, and solve the last three corners. If there are two solved corners, you must turn the cube so the solved corners are at the top of the upper face and do the following algorithm. This algorithm will rotate all edges but one, which means the two solved corners will be lost. The algorithm is as follows: R, U, Ri, U, R, U2, Ri, U2
Step 6: Position the Last Corners
- If there are two correctly positioned corner pieces (matching pairs), turn the top face so the pre-solved pieces are at the back. Then turn the cube so you face the original side, so the first side is at the front and the last side is at the back, and do this algorithm, making sure that the pieces that need to swap are now both on the top face: Ri, U, Ri, D2, R, Ui, Ri, D2, R2
- If there are no correctly positioned corner pieces (matching pairs), turn the cube so you face the original side, so the first side is at the front and the last side is at the back, and do this algorithm, making sure that the pieces that need to swap are now both on the top face: Ri, U, Ri, D2, R, Ui, Ri, D2, R2. Then, look at number 1 on this step.
Step 7: Position the Last Layer Edges
- If, at this stage, there are three solved sides and three unsolved sides, turn the whole cube so the newly solved side is at the back, and there is an unsolved side facing you, and to the left and right of it. Then, decide whether the unsolved edge pieces need to go clockwise to be in the correct position, or anticlockwise. If they need to go clockwise, do this algorithm: Li, Ui, L, Ui, Li, U2, L, Ui, R, U, Ri, U, R, U2, Ri, U2. If they need to go anticlockwise, carry out the following algorithm: R, U, Ri, U, R, U2, Ri, U, Li, Ui, L, Ui, Li, U2, L, Ui
- If there are no solved edges on the top layer, do this algorithm: Li, Ui, L, Ui, Li, U2
Solve a 2x2 Cube
Questions & Answers
Question: Is there an easier way to solve the Rubik's cube?
Answer: This is the easiest method that I know. Once you have used it a few times, then it becomes easier.
Question: What does inverted mean when solving a Rubik's cube?
Answer: This means that when you look at the appropriate face, you turn the face anti-clockwise instead of clockwise.
Question: Is this method of solving a Rubik's cube supposed to work from any position?
Answer: Yes - any starting position is okay.
IQplusone (author) on March 17, 2020:
Give it another go. Perhaps one of the stages went wrong.
Coo cool on March 02, 2020:
Sooooooo hard
Coop on February 22, 2020:
It does not tell u how to solve it
Nina on December 02, 2019:
I know it's so hard to solve and I'm legit getting really sick and tired of it being so hard
Araf on September 27, 2019:
Hey bro,
This doesn't work at all but it's a good video
GAMER76543210 on August 16, 2019:
THIS IS SO HARD!!!
Darren on November 18, 2018:
easy to do a 3x3x3
ALANNA WIKTOROWICZ on November 18, 2018:
I agree with you Carlos
Liam on June 08, 2018:
This is so easy I don't even need to watch a video to solve a rubiks cube 2x2x2
Carlos on May 19, 2018:
Please teach me how to solve a rubiks cube
Nicky on May 11, 2018:
This is so hard!!!!!
Courtney Ptomy deon jr on December 11, 2017:
How is it so easy please tell me how to just solve it
Felisha on January 27, 2016:
This is hard
Jayson on March 02, 2015:
Nice one . made it easy
saikrishna on November 16, 2014:
It simple formula s
Related Articles
Source: https://hobbylark.com/puzzles/how-to-3x3x3-cube
0 Response to "How to Solve a Rubiks Cube 3x3 Easy"
Post a Comment